This switch is normally open, and connects to the power switch on the computer.
You can just leave out one of the blank PCI slot covers in the back of the computer, and run the wires from the switch through it.
But I wanted to be able to unplug everything so the computer can be easily removed.
So I bought a 1/4" phono plug and jack. This plug is greatly over sized for what I need, but I wanted something that was different from all the other jacks and plugs on the computer, so that it couldnt be accidentally plugged into the wrong jack.
I also needed a plug and jack to attach the switched power strip.
This needed to be different from everything else too.
I bought a plug and jack similar to what is on power adapters.
I mounted the two jacks in a blank PCI slot cover.
Here is a pic:

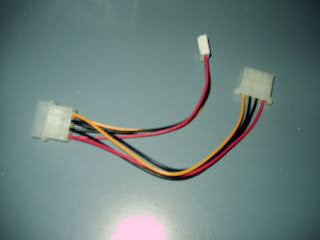
I then used a power Y adapter. This has a male and a female computer power plug, and a small plug for floppy drives.

I cut the floppy drive plug off, I dont need it.
I then cut one of the black wires and the red wire off short. I capped both with heat shrink.
The red and black are +5vdc and ground. My switched power strip has a 12 volt relay, so I dont need the 5 volt leads. I connected the yellow wire to the center terminal of the small jack, and the black wire to the outside terminal. I also soldered a diode across these wires. This is to quench the surge from the relay when it turns off. When current stops flowing through a coil, the collapsing magnetism in the coil generates a reverse current, called Back EMF. This back current can be hundreds of volts. It only lasts for a few milliseconds, but it can damage electronic semi-conductors. I doubt if the computer's power supply would be harmed, but I figure why take the chance? The diode across the leads to the relay will "short out" the back emf, thus protecting the computer. I used one of the 1 amp diodes I bought earlier. (see the load/save entry). The cathode (band) of the diode goes on the yellow wire. (Important.)

I then soldered two wires to the 1/4" jack. This will be for the remote on switch.

I then removed one of the blank PCI slot covers and replaced it with the one I had modified.
I had a spare power plug that I used for the power jack, but if I didnt have one I could have un-plugged the hard drive power plug, plugged it into my Y adapter, then plugged the other plug on the Y adapter back into the hard drive.
 I then cut two wires going to the computer's power switch. I connected my switch jack into the wires, soldered them, and insulated with heat shrink. This computer, a IBM Netvista, had 4 wires on the power switch. This is the first computer I have seen with more than 2 wires on the switch. There were two yellow and two blacks. I found on the internet that you can splice into either of the yellow and black wires for a remote switch.
So I picked a yellow and black, cut and trimmed them. Then I plugged up the computer and touched the two wires together for a test. The computer came on, so I then turned off the computer, unplugged it from the wall, and soldered my remote switch wires into the circuit.
I soldered the power on switch back in too, so the computer can still be turned on from the front of the computer.

I then replaced the computer's cover.
I now have two extra jacks on the back of the computer. My switched power strip and the "machine on" button on the control panel now have a place to plug into.

On my next entry, I will show how I hacked a cheap power strip to a 12 volt relay.
Note: if you try the above procedures, please make sure your computer is turned off and unplugged. A slip of the hand could short something and cause you a terrible headache.
------------------------

No comments:
Post a Comment