Mounted both joysticks, all the buttons, and the trackball.
I printed out several arcade characters. I also made up some labels for the buttons.
Here is a pic of the panel before mounting trackball..

And here is a close up of the right side..

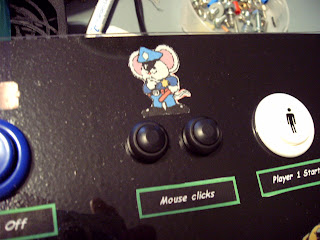
Here is a close up of the mouse click buttons...
The label got a little crooked, not sure how.
I used a glue stick to attach the pictures and labels to the wood, then the plexi glass should hold them, but somehow this label got a little off. Got to decide now if it is bad enough to tear everything down to fix it.

Here are the mouse click buttons, before mounting them. I got these buttons from allelectronics.com

Here is a pic of the controls, ready to be wired.
I still have to mount the keywiz eco2 keyboard encoder, then I can wire all the buttons.
The "machine on" button (green) will not be wired into the encoder. It will wire directly to the computer to turn it on.
The mouse click buttons will not wire to the encoder either. They will attach to the mouse hack.
I stated earlier that I will hack a mouse for the trackball. Actually, I had already hacked a USB mouse for this trackball, but I found that the computer I am going to use gives an error on bootup if it doesnt see a PS/2 mouse, so I am going to hack a PS/2 mouse. I plan to document that when I do it.
I could have disabled the error in BIOS, but the computer still has to completely boot up before recognizing the trackball, so I will just re-hack it to a PS2 mouse.
I also need to attach the LED to the trackball to light it up. more on that later.

Here is a close up of the joystick mounting method I used. Thought you might like to see how it turned out. I am leaving the handles out of the joysticks until the wiring is finished. It makes it somewhat easier to lay the control panel on its front without the handles in the way..
Notice also the way I had to counter sink the nuts for the trackball..
(Right behind the joystick in this picture.)
 I used 8/32" bolts and nuts to mount the joysticks. (1-1/4" long, available at Walmart.)
Now, I got to mount the keyboard encoder and get out the soldering gun!
------------------------------------

No comments:
Post a Comment